Part 2 of Neil Miller’s series on Straight Razors. Part 1 can be found here
https://shavehelp.com/how-to-choose-a-straight-razor-beginners-guide/
Once you have decided on a razor, you need to consider what else is necessary to maintain it. What’s the bare minimum of equipment that you need to keep it shave-ready? The simple answer is a strop – at least in the short term. Depending upon usage and how careful you are, the razor may not need to see a hone for 6 months or more.
Why Strop?
Stropping preps the razor ready for shaving. If the razor has just been honed then stropping also helps to refine and tame the edge – it will probably be too sharp/harsh to shave with fresh off the hone – although some people do shave after honing without stropping first. In my experience, stropping definitely makes the edge smoother and keener – a razor might not pass the HHT (Hanging Hair Test) fresh off the hone, but it will after it has been stropped. You could say that the primary purpose is to extend the time period between honing. However, no matter how carefully you strop and whatever pastes and powders you coat a strop with, that time will come around sooner or later!
Most people strop just before shaving, some before and after. I do the latter – I find that it helps to dry the blade, and the oil-rich latigo leather I use in the strops I make also leaves a thin protective film on the cutting edge. There is a theory that the razor “develops” an edge after resting, say for 24 hours or preferably 48 hours, and that stropping after shaving interferes with this process. Older members may recall that “razor pyramids” used to be on sale – you put a razor under the pyramid, aligned it and left it – the edge was supposed to grow back. Whether there is anything in that I don’t really know! That stropping works is self-evident, but what is happening during the process? There are many theories, some of them crack-pot, but here are some of the serious contenders:
The Saw-Tooth Edge Theory
A lot of people say that if you look at a razor’s edge under extreme magnification, it is serrated like a saw blade. When shaving, the microscopic and very fragile teeth are supposed to get pushed out of line by the bristles – the purpose of stropping, then, is to re-align these teeth ready for shaving once again.
The Micro-Fin Theory
Similar to the above, but instead of little teeth being present at the edge of the blade a very thin, delicate strip of metal called the “fin” is present. It gets pushed aside, buckled and deformed by the process of shaving and stropping realigns it.
The Polish/Oxidation Theory
No matter how careful you are, water and moisture in the air corrode the blade, especially so at its most delicate part, the cutting edge. Stropping is said to remove the minute film of oxidation that has formed, and to further refine the edge by polishing it, like an ultra-smooth hone. A follow-up to this is that various leathers have various grit sizes, smooth firm leather is said to give the finest polish.
Research by J. G. Pratt in 1931 firmly blew the saw-tooth theory out of the water. He demonstrated that what looked like saw-teeth under magnification was really just the interplay between shadows and highlights and that even more magnification and better lighting made the tooth-effect disappear and the cutting edge took on the uniform shape of a ribbon of metal. More photographs, taken after shaving, showed this ribbon of metal was buckled, rolled-over in places and generally deformed – it even had chips. He took more photos after stropping and showed that the ribbon of metal had been pushed back into place, and was even micro-abraded to the extent that small chips were evened-out and the edge both lightly refined and polished.
There is no doubt that stropping also removes oxidation, but its primary purpose is to polish and refine the edge of the blade.
Types of Strop
Strops can be broadly subdivided into three main types:
- Hanging strops
- Paddle strops
- Bench strops
Hanging Strops
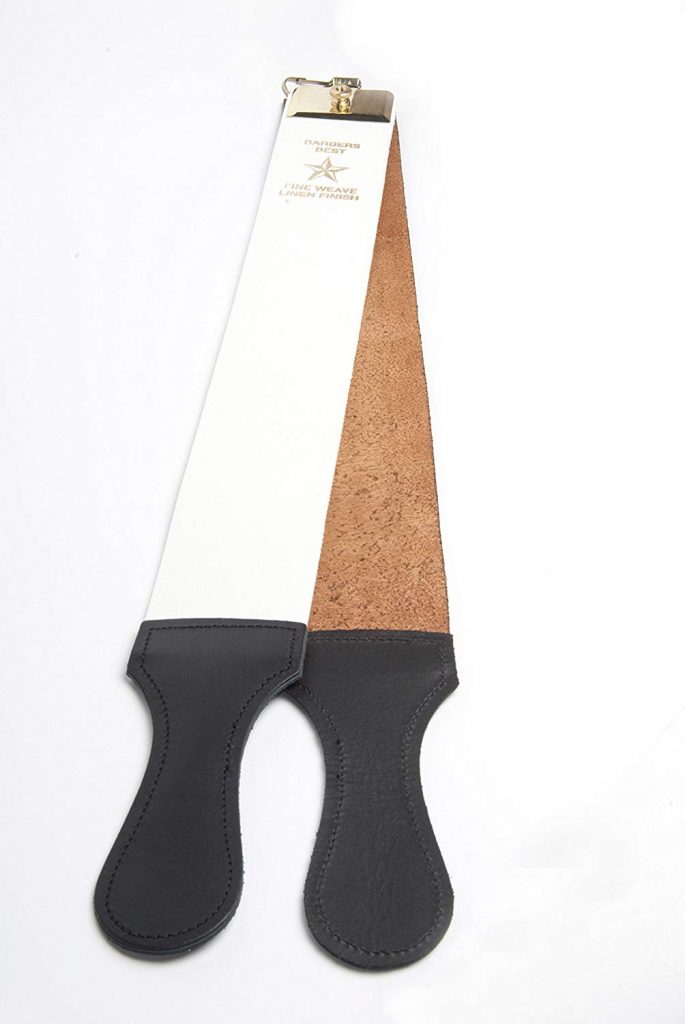
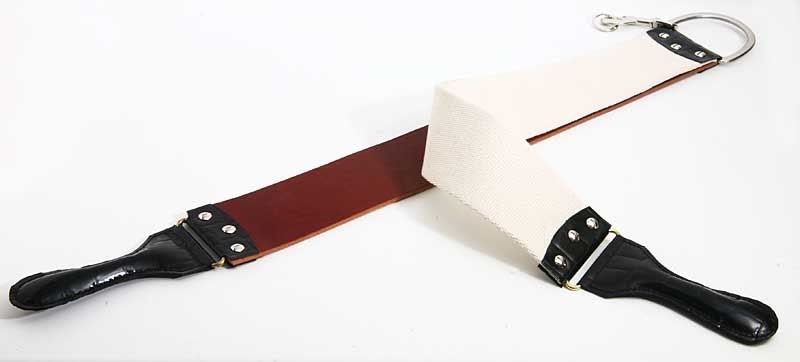
Perhaps the most archetypal form, the hanging strop comes in a few varieties. It may be a simple leather strap, a double-sided leather strap or a double strop with leather and canvas straps. The handle may be simply cut into the leather – some single leather strops don’t even have a handle! – or be attached to the strop by a stitched panel. A single leather strop can be hung simply by passing a thong through a hole in the end, or it may have hardware that slips over a hook set in the wall. Double strops usually have a swiveling attachment at the hanging end, so that the strop can be flipped from one side to the other without taking it off the wall.

Although they look deceptively simple to use, they are perhaps the hardest for a novice to master. Not only must he concentrate on his technique, he must also ensure that the strop is pulled taut enough – too much sag and the edge of the razor will be rolled and damaged.
Paddle Strops
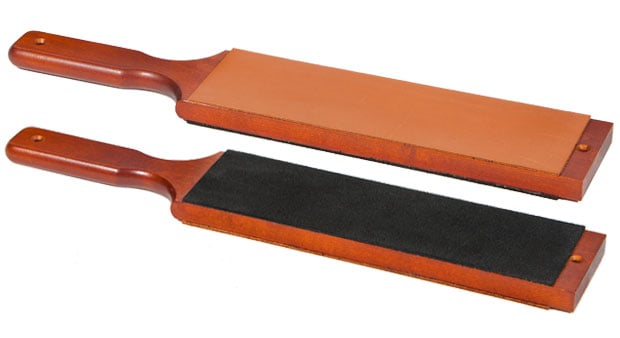
As the name suggests, these are paddle-like and held in the hand with one end resting on a bench or similar. They may be constructed of a thin plank with leather glued to one or both sides (some have a balsa wood panel for pasting) or the leather may take the form of a belt stretched over a framework equipped with a mechanism for tightening it (which must be loosened again after use or the leather will be permanently stretched) – these are called “loom” or “french” strops. Some paddles have a padding to give the leather a bit of “give,” some don’t, and the loom strops can alter the amount of tension to suit the user.

Bench Strops
These look like paddle strops on steroids and live on a bench. They are usually quite robustly made, do not have a handle and keep the leather suspended between two blocks of timber attached to a timber base. They tended to be more common on the continent.
Strop Width
With the exception of vintage paddle strops which may be very short and thin, strops are usually available from 2 inches to 3 inches wide, in multiples of a quarter of an inch: 2.00, 2.25, 2.50, 2.75, 3.00. Most straight razors have a cutting edge in the region of 2.5 – 2.75 inches in length, the implication being that the wider strops will accommodate the whole of the blade without having to resort to an X-pattern while stropping. Sounds great on paper, but as with honing the X-pattern has certain benefits – not all blades lay dead flat and simply drawing the blade up and down does not ensure that all parts of the blade come into contact with the strop. Some blades are distinctly warped, bent or “smiling” in aspect. While a certain degree of sag will allow the leather to come into contact with a mildly deformed blade, the X-pattern on a narrower strop will ensure that all parts of the blade receive equal attention.
Strop Material
Strops are available in leather, leather-substitutes, linen, canvas, cotton, hard felt, and no doubt other exotic materials I haven’t heard of! While a single leather strop is all you need, it is nice to have a double leather/canvas strop or even a leather/leather strop – you then have the option of one coarse and one fine side and the means to experiment with pastes and powders.
Leather
There are several types of leather commonly available, the main types being cowhide and latigo.
Horsehide (also known as “shell”) used to be widely available but is not commonly encountered anymore except on the continent and in the US, where they are less squeamish about our four-footed friends. Ordinary horsehide is very supple and smooth and tends to give very little draw – this makes it hard to obtain a satisfactory edge. Premium grade horsehide – shell – on the other hand, is one of the best materials for a strop. Shell – real shell, that is, is very expensive. It comes from Cordoba originally, from the rump of the horse, and a good shell is said to furnish enough leather to make one pair of shoes. To reduce the price (and increase the length of the strop) the lesser leather at the sides of the shell is used.
Russian strops can also be had – the name comes from the long, slow method of tanning the leather employed in Russia, usually using birch oil and a deep red dye. This type of strop is usually mechanically compressed, having a textured side for preliminary stropping and a flat side to finish on. The leather is usually hard and stiff.
Cowhide is fine for strops – providing that it is vegetable tanned and has no artificial surface (“chrome”) finishing. It can give a very fine finish to a razor and can have very little “draw” unless treated with conditioners or oils. “Draw” refers to the drag on the blade that you feel while stropping, so a strop with very little draw gives you the feeling that the razor is slipping across the surface, while a strop with very heavy draw tends to grab and slow down the razor.
Latigo is a fine choice for a strop – for me, it has just the right amount of draw due to the way it is processed – it is vegetable tanned, then the tanner heavily impregnates it with oils, then it is hand buffed to produce a soft-surfaced, slightly stretch moisture-resistant leather.
Linen/Canvas/Cotton/Jute/Hemp – all of these have been used for the material side of a strop, the most common being cotton canvas. Linen is supposed to be finer – but you pay your money and take your choice – I doubt if you would spot any difference. They are coarser than leather, their raison d’etre being that they prepare the razors edge for stropping, possibly by coarsely aligning it, possible by warming it up. The heavily ribbed fabrics that are usually favoured used to have the gaps filled-in by rubbing with a dry cake of soap in the days of the old-time barber, and sometimes by coating with a white paste consisting of ground chalk.
Which type of strop should you get?
A lot of people say that a paddle strop is easier for the novice – it takes the degree of tautness out of the equation leaving just the technique to concentrate on. I would opt for a modest leather hanging strop, 2 or 2.5 inches wide to begin with. Why modest? Because it will be cheaper and you will most certainly nick it during the learning process unless you are a prodigy of some sort!
Ancillary Items
Strop Pastes and Powders
There are a plethora of these on the market, none of them essential but they can be fun to experiment with. Some are just to condition and maintain a leather strop, one is solely for use on a cotton strop, and others are for refining a dull edge and range from coarse to very fine. The following are listed in no particular order of merit:
Black Paste: very little abrasive power, used mainly to achieve a high degree of polish, used on leather.
Red Paste: a bit coarser than the black version, for refining a dull edge.
Green Paste: coarse, for a very dull edge and before moving on to the red paste.
Yellow Paste: no abrasive power at all. It is basically just fat – tallow – used to keep a leather strop supple and to increase draw. A little goes a long way – when the strop seems to lose draw rub a 1-inch long bead of it into the surface. One small tube should last for more than a year.
Neatsfoot Oil – a cheaper alternative to the yellow paste.
White Paste: abrasive, contains powdered chalk. For cotton.
Chrome Oxide Powder: used to refine a dull edge, use a light coating on leather or balsa wood, only 10 or so round laps are necessary. It cuts quite fast and will shorten the time before the razor has to be honed on a stone.
Diamond Paste/Spray: can be used on material or leather and is available in a number of grit sizes. Quickly refines an edge, but even the finest grit can leave the razor with a harsh edge that needs to be smoothed by resorting to chrome oxide.
Oils
Neatsfoot Oil: as above, also useful in renovating an old, dried strop.
Ballistol: can be used to rejuvenate old, dried leather, and for putting on the razor to keep corrosion at bay. Mildly antiseptic. It doesn’t harm the skin.
Camellia: applied to the blade it keeps corrosion away – thicker than Ballistol and can go off. It doesn’t harm the skin.
Clove Oil: historically used to oil metal. Sometimes blended with Camellia (it stops it going rancid). Strongly antibacterial.
